
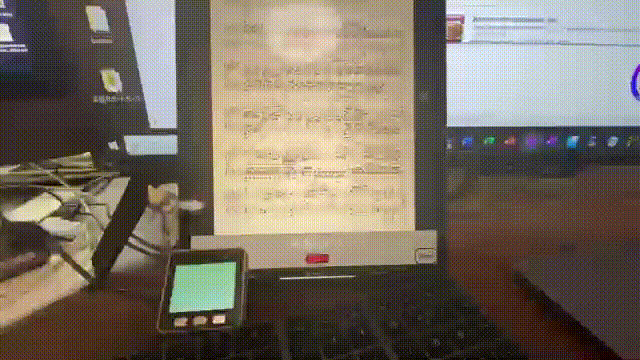
今日は、SwiftUIとM5Stackをつかって、双方向コミュニュケーションのサンプルプログラムです。iOS(True-depthカメラ搭載のもの)でユーザーの顔の垂直方向の顔の傾きを検出してM5Stackの画面の色をグラデーションを使って変化させます。また、顔の左右方向の傾きで楽譜を譜めくりし、M5Stackのボタン操作でも譜めくりができるサンプルプログラムです!
GitHubに公開していますので、XcodeのprojectとArduinoのプログラムをこちらからクローンできます。
SwiftUIのプログラミングの解説は次回以降のブログで数回に分けて行う予定です。
今日は、まず、M5Stackを制御するArduinoプログラムを簡単に解説します。
#include <M5Stack.h>
// Bluetooth LE
#include <BLEDevice.h>
#include <BLEServer.h>
#include <BLEUtils.h>
#include <BLE2902.h>

///////////////
bool updateColor;
String lastColor;

bool updatePedal;
int pedalValue;

// the setup routine runs once when M5Stack starts up
void setup(){

  // Initialize the M5Stack object
  M5.begin();

  M5.Lcd.print("Setup....");

  initBLE();
  initLCDcolor();

  M5.Lcd.println("Done");
}

// the loop routine runs over and over again forever
void loop() {
  M5.update();
  loopBLE();
  loopLCDcolor();
  loopPedalValue();
}

///////////////////
// Bluetooth LE  //
///////////////////
BLEServer *pServer = NULL;
BLECharacteristic * pNotifyCharacteristic;
bool deviceConnected = false;
bool oldDeviceConnected = false;

#define LOCAL_NAME                  "M5Stack-Color"
// See the following for generating UUIDs:
// https://www.uuidgenerator.net/
#define SERVICE_UUID                "e5a1c9a8-ab93-11e8-98d0-529269fb1459"
#define CHARACTERISTIC_UUID_RX      "e5a1cda4-ab93-11e8-98d0-529269fb1459"
#define CHARACTERISTIC_UUID_NOTIFY  "e5a1d146-ab93-11e8-98d0-529269fb1459"

// Bluetooth LE Change Connect State
class MyServerCallbacks: public BLEServerCallbacks {
    void onConnect(BLEServer* pServer) {
      deviceConnected = true;
    };

    void onDisconnect(BLEServer* pServer) {
      deviceConnected = false;
    }
};

// Bluetooth LE Recive
class MyCallbacks: public BLECharacteristicCallbacks {
    void onWrite(BLECharacteristic *pCharacteristic) {
      std::string rxValue = pCharacteristic->getValue();
      if (rxValue.length() > 0) {
       // String cmd = String(rxValue.c_str());
//先頭がaの場合に引き続く数字(0-47)を取り出してInt型に変換し画面の処理を行う。
        std::string headLetter = rxValue.substr(0,1);
        if (headLetter == "a") {
        std::string numStr = rxValue.substr(1);
        pedalValue = atoi(numStr.c_str());

        Serial.print("Pedal Value (width): ");
        Serial.println(pedalValue);

        updatePedal = true;

        }//if rxValue.substr(0,1) == "a"の最後の}
      }//if (rxValue.length() > 0) の最後の}
    }
};

// Bluetooth LE initialize
void initBLE() {
  // Create the BLE Device
  BLEDevice::init(LOCAL_NAME);

  // Create the BLE Server
  pServer = BLEDevice::createServer();
  pServer->setCallbacks(new MyServerCallbacks());

  // Create the BLE Service
  BLEService *pService = pServer->createService(SERVICE_UUID);

  // Create a BLE Characteristic
  pNotifyCharacteristic = pService->createCharacteristic(
                        CHARACTERISTIC_UUID_NOTIFY,
                        BLECharacteristic::PROPERTY_NOTIFY
                        );

  pNotifyCharacteristic->addDescriptor(new BLE2902());

  BLECharacteristic * pRxCharacteristic = pService->createCharacteristic(
                       CHARACTERISTIC_UUID_RX,
                      BLECharacteristic::PROPERTY_WRITE
                    );

  pRxCharacteristic->setCallbacks(new MyCallbacks());

  // Start the service
  pService->start();

  // Start advertising
  pServer->getAdvertising()->start();
}

// Bluetooth LE loop
void loopBLE() {
    // disconnecting
    if (!deviceConnected && oldDeviceConnected) {
        delay(500); // give the bluetooth stack the chance to get things ready
        pServer->startAdvertising(); // restart advertising
        Serial.println("startAdvertising");
        oldDeviceConnected = deviceConnected;
    }
    // connecting
    if (deviceConnected && !oldDeviceConnected) {
    // do stuff here on connecting
        oldDeviceConnected = deviceConnected;
    }
}

///////////////
// LCD Color //
///////////////
void initLCDcolor() {
  lastColor = "NONE";
}

void loopLCDcolor() {
  if (M5.BtnA.wasPressed())
  {
    lastColor = "RED";
    updateColor = true;
  }
  if (M5.BtnB.wasPressed())
  {
    lastColor = "YELLOW";
    updateColor = true;
  }
  if (M5.BtnC.wasPressed())
  {
    lastColor = "BLUE";
    updateColor = true;
  }

   if (updateColor) {
    if (deviceConnected) {
      char sendMessage[10];
      lastColor.toCharArray(sendMessage, 10);
      pNotifyCharacteristic->setValue(sendMessage);
      pNotifyCharacteristic->notify();
    }
    updateColor = false;
  }
}

//////////////////////////////////
//  Pedal Value -> Color Gradarion
//////////////////////////////////
void loopPedalValue() {
  if (updatePedal) {
    if (pedalValue <= 0) {
          M5.lcd.fillScreen(0xdf79);
        } else if (pedalValue < 5) {
          M5.lcd.fillScreen(0xbf15);
        } else if (pedalValue < 10) {
          M5.lcd.fillScreen(0x9691);
        } else if (pedalValue < 15) {
          M5.lcd.fillScreen(0x762e);
        } else if (pedalValue < 20) {
          M5.lcd.fillScreen(0x55ad);
        } else if (pedalValue < 25) {
          M5.lcd.fillScreen(0x354d);
        } else if (pedalValue < 30) {
          M5.lcd.fillScreen(0x1ccd);
        } else if (pedalValue < 35) {
          M5.lcd.fillScreen(0x0c6f);
        } else if (pedalValue < 40) {
          M5.lcd.fillScreen(0x03cf);
        } else if (pedalValue < 45) {
          M5.lcd.fillScreen(0x028d);
        } else  {
          M5.lcd.fillScreen(0x016b);
        }

   updatePedal = false;
  }
}
前回ご紹介したように(エンジョイSwiftUIプログラミングその25(bFaaaPその2:ArduinoM5Stack))藤さんと言う方が公開されているプログラムを参考にしました(GitHubはこちら)。
ですので、違う部分を主に解説いたします。
// Bluetooth LE Recive
class MyCallbacks: public BLECharacteristicCallbacks {
    void onWrite(BLECharacteristic *pCharacteristic) {
      std::string rxValue = pCharacteristic->getValue();
      if (rxValue.length() > 0) {
       // String cmd = String(rxValue.c_str());
//先頭がaの場合に引き続く数字(0-47)を取り出してInt型に変換し画面の処理を行う。
        std::string headLetter = rxValue.substr(0,1);
        if (headLetter == "a") {
        std::string numStr = rxValue.substr(1);
        pedalValue = atoi(numStr.c_str());

        Serial.print("Pedal Value (width): ");
        Serial.println(pedalValue);

        updatePedal = true;

        }//if rxValue.substr(0,1) == "a"の最後の}
      }//if (rxValue.length() > 0) の最後の}
    }
};
rxValueは、Blootoothからgetされる値ですが、iOSからは「a数値」という形のstringsで送られてきます。ですので、このheadLetter(数値の種類を識別するための識別子)が”a”である場合にそれに引き続き数値をintegerにして、pedalValueに渡します。そして、このpedalValueの更新があったことをフラグであるupdatePedalにtrueとしてセットして、次の処理を開始します。
//////////////////////////////////
//  Pedal Value -> Color Gradarion
//////////////////////////////////
void loopPedalValue() {
  if (updatePedal) {
    if (pedalValue <= 0) {
          M5.lcd.fillScreen(0xdf79);
        } else if (pedalValue < 5) {
          M5.lcd.fillScreen(0xbf15);
        } else if (pedalValue < 10) {
          M5.lcd.fillScreen(0x9691);
        } else if (pedalValue < 15) {
          M5.lcd.fillScreen(0x762e);
        } else if (pedalValue < 20) {
          M5.lcd.fillScreen(0x55ad);
        } else if (pedalValue < 25) {
          M5.lcd.fillScreen(0x354d);
        } else if (pedalValue < 30) {
          M5.lcd.fillScreen(0x1ccd);
        } else if (pedalValue < 35) {
          M5.lcd.fillScreen(0x0c6f);
        } else if (pedalValue < 40) {
          M5.lcd.fillScreen(0x03cf);
        } else if (pedalValue < 45) {
          M5.lcd.fillScreen(0x028d);
        } else  {
          M5.lcd.fillScreen(0x016b);
        }

   updatePedal = false;
  }
}
これはupdatePedalのフラグがtrueの場合に、pedalValueの数値に応じてM5Stackの画面の色をグラデーションで変化させます。
では、この色の数値の設定について解説します。
M5.lcd.fillScreen(0xdf79)の「0xdf79」の部分が色のコードとなっています。では、どのようにしてグラデーションをつくるのかを見ていきます。
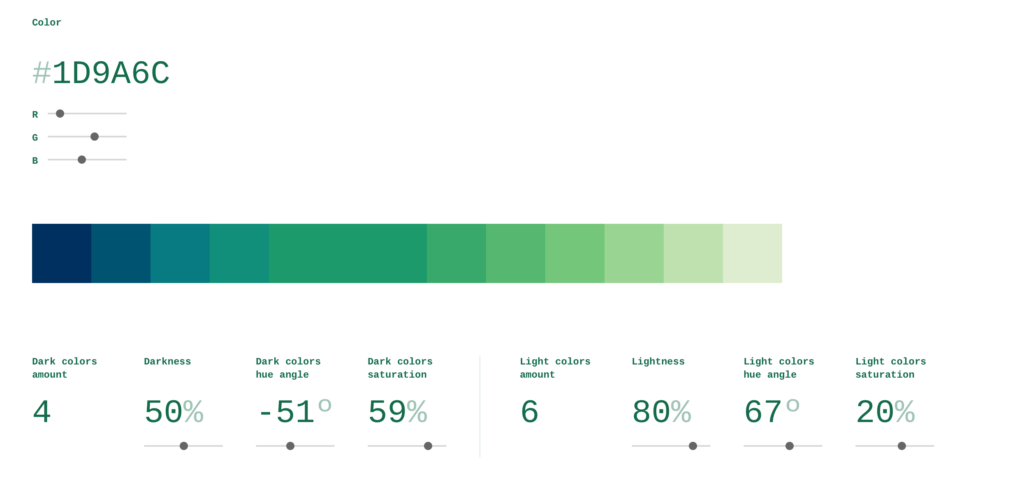
このように不連続な色のグラデーションを設計するのに有用なサイトがあります。このサイトを利用して個々のグラデーションのRGB(例、#1D9A6C)の値を得ます。
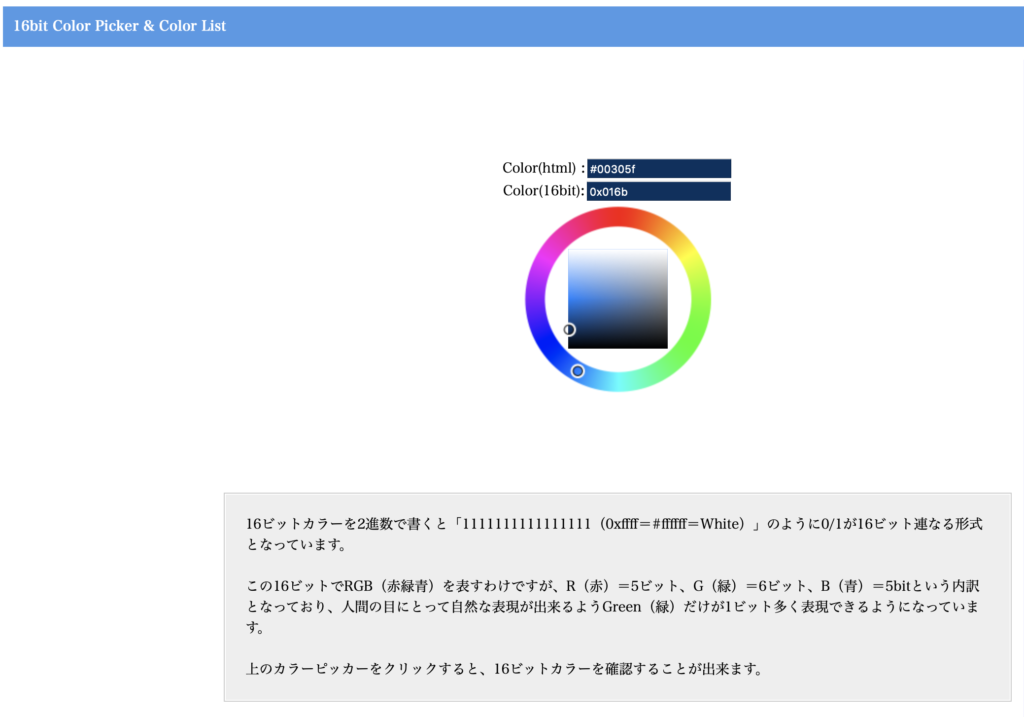
次にM5StackのカラーシステムはRGB565なので、この値をRGB565システムの値にこのサイトを使って変換します。
具体的には以下のものでした。
上からカラーコード
1. DEEDCF  -> 0xdf79
2. BFE1B0  -> 0xbf15
3. 99D492  -> 0x9691
4. 74C67A  -> 0x762e
5. 56B870  -> 0x55ad
6. 39A96B  -> 0x354d
7. 1D9A6C  -> 0x1ccd
8. 118F7B  -> 0x0c6f
9. 087A81  -> 0x03cf
10. 015372  -> 0x028d
11. 00305F  -> 0x016b
この値をArduinoのルーチンの対応する部分に入れると、頭の角度を検出して画面の色のグラデーション変化にして表示するSwiftUI/Arduinoプログラムが出来上がります。
いかがでしたか。次回以降数回に渡って、今度はSwiftUIのプログラミングで如何にPDF, Bluetooth, Augumented Realityの顔情報を制御するのかを解説していこうかなと思っています。
コメント