
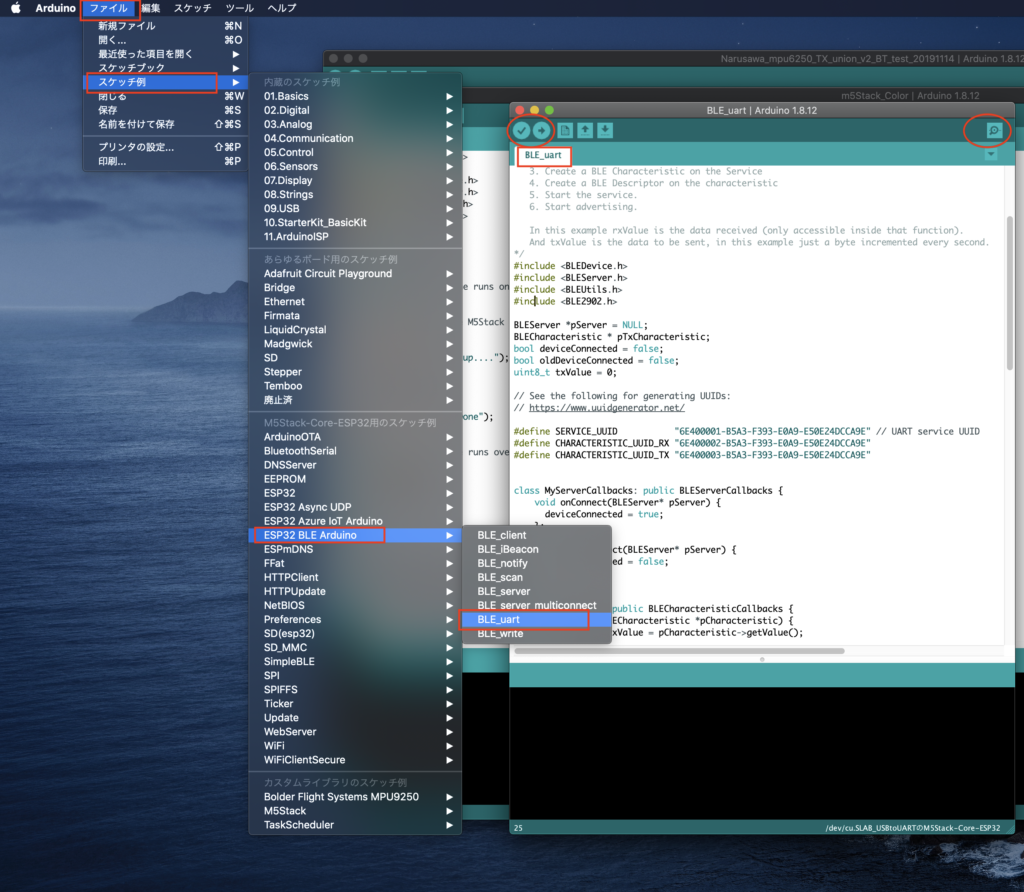
では、SwiftUIとArduinoのBLE双方向通信を実現しましょう!ESP32を使用するBLE双方向通信はサンプルSketchがArduino IDEに提供されています。成澤さんが教えてくれました。スケッチ例のBLE-uartがそれです。

実際のコードはこれです。
/*
    Video: https://www.youtube.com/watch?v=oCMOYS71NIU
    Based on Neil Kolban example for IDF: https://github.com/nkolban/esp32-snippets/blob/master/cpp_utils/tests/BLE%20Tests/SampleNotify.cpp
    Ported to Arduino ESP32 by Evandro Copercini

   Create a BLE server that, once we receive a connection, will send periodic notifications.
   The service advertises itself as: 6E400001-B5A3-F393-E0A9-E50E24DCCA9E
   Has a characteristic of: 6E400002-B5A3-F393-E0A9-E50E24DCCA9E - used for receiving data with "WRITE"
   Has a characteristic of: 6E400003-B5A3-F393-E0A9-E50E24DCCA9E - used to send data with  "NOTIFY"

   The design of creating the BLE server is:
   1. Create a BLE Server
   2. Create a BLE Service
   3. Create a BLE Characteristic on the Service
   4. Create a BLE Descriptor on the characteristic
   5. Start the service.
   6. Start advertising.

   In this example rxValue is the data received (only accessible inside that function).
   And txValue is the data to be sent, in this example just a byte incremented every second.
*/
#include <BLEDevice.h>
#include <BLEServer.h>
#include <BLEUtils.h>
#include <BLE2902.h>

BLEServer *pServer = NULL;
BLECharacteristic * pTxCharacteristic;
bool deviceConnected = false;
bool oldDeviceConnected = false;
uint8_t txValue = 0;

// See the following for generating UUIDs:
// https://www.uuidgenerator.net/

#define SERVICE_UUID           "6E400001-B5A3-F393-E0A9-E50E24DCCA9E" // UART service UUID
#define CHARACTERISTIC_UUID_RX "6E400002-B5A3-F393-E0A9-E50E24DCCA9E"
#define CHARACTERISTIC_UUID_TX "6E400003-B5A3-F393-E0A9-E50E24DCCA9E"


class MyServerCallbacks: public BLEServerCallbacks {
    void onConnect(BLEServer* pServer) {
      deviceConnected = true;
    };

    void onDisconnect(BLEServer* pServer) {
      deviceConnected = false;
    }
};

class MyCallbacks: public BLECharacteristicCallbacks {
    void onWrite(BLECharacteristic *pCharacteristic) {
      std::string rxValue = pCharacteristic->getValue();

      if (rxValue.length() > 0) {
        Serial.println("*********");
        Serial.print("Received Value: ");
        for (int i = 0; i < rxValue.length(); i++)
          Serial.print(rxValue[i]);

        Serial.println();
        Serial.println("*********");
      }
    }
};


void setup() {
  Serial.begin(115200);

  // Create the BLE Device
  BLEDevice::init("UART Service");

  // Create the BLE Server
  pServer = BLEDevice::createServer();
  pServer->setCallbacks(new MyServerCallbacks());

  // Create the BLE Service
  BLEService *pService = pServer->createService(SERVICE_UUID);

  // Create a BLE Characteristic
  pTxCharacteristic = pService->createCharacteristic(
										CHARACTERISTIC_UUID_TX,
										BLECharacteristic::PROPERTY_NOTIFY
									);

  pTxCharacteristic->addDescriptor(new BLE2902());

  BLECharacteristic * pRxCharacteristic = pService->createCharacteristic(
											 CHARACTERISTIC_UUID_RX,
											BLECharacteristic::PROPERTY_WRITE
										);

  pRxCharacteristic->setCallbacks(new MyCallbacks());

  // Start the service
  pService->start();

  // Start advertising
  pServer->getAdvertising()->start();
  Serial.println("Waiting a client connection to notify...");
}

void loop() {

    if (deviceConnected) {
        pTxCharacteristic->setValue(&txValue, 1);
        pTxCharacteristic->notify();
        txValue++;
		delay(10); // bluetooth stack will go into congestion, if too many packets are sent
	}

    // disconnecting
    if (!deviceConnected && oldDeviceConnected) {
        delay(500); // give the bluetooth stack the chance to get things ready
        pServer->startAdvertising(); // restart advertising
        Serial.println("start advertising");
        oldDeviceConnected = deviceConnected;
    }
    // connecting
    if (deviceConnected && !oldDeviceConnected) {
		// do stuff here on connecting
        oldDeviceConnected = deviceConnected;
    }
}
サンプルコードの一番上にあるように、ESP32のBLEnotify()についてのYoutubeの解説があります。英語ですが、ゆっくり喋っているので聞きやすいと思います。
私はSwiftからプログラミングに入っているのでC++の文法はよくわかりませんが、調べながら「こうではないかな?」と思うことを書いていきます。
#include <BLEDevice.h>
#include <BLEServer.h>
#include <BLEUtils.h>
#include <BLE2902.h>
ESP32で BLEを使用するためにはこの4つのライブラリーをincludeする必要があるようです。BLE2902.hは上のビデオでもありましたがCharacteristicのDescriptor(性質を記載するもの)用のようですね。
BLEServer *pServer = NULL;
BLECharacteristic * pTxCharacteristic;
bool deviceConnected = false;
bool oldDeviceConnected = false;
uint8_t txValue = 0;
最初は、BLEServerクラスのオブジェクト(SwiftUIの用語の使用法(こちらも怪しい)に対応させていうので、実際のC++の用語の使い方ではないと思います。以下同じ)をポインター変数として定義して、その値(ポインターアドレスが示すところの値)にNULLを代入しているようです。
「*」がポインター変数を表す演算子です。SwiftUIにポインタ変数のような記載はないように思います。ポインタに関しては、例えばここを参照しました。
ポインタ変数・ポインタ変数、またはポインタとは、アドレスを保持する変数のこと。
https://qiita.com/yokoto/items/5672ff20b63815728d90
・ ポインタ変数を使うことは、メモリのアドレスを使って別のデータにアクセスする方法の一つ。
BLECharacteristic * pTxCharacteristic;は、最初「*」が中間にあるのでどうしてかなと思いましたが、上記サイトによるとポインタ変数の宣言であることは同じであるとありました。したがって、BLECharacteristicのオブジェクトであるpTxCharacteristic(送信用のもの)をポインタ変数として宣言しているもののようです。
その下の3つはSwiftUIでも似たような定義で、それぞれbool型とuint8_t型の変数としてBLEの接続先のデバイスの状態「deviceConnected」「oldDeviceConnected」と送信用の値「txValue」(初期値は0で送信毎に値を増やすようにプログラミングされています)を定義しているようです。
#define SERVICE_UUID           "6E400001-B5A3-F393-E0A9-E50E24DCCA9E" // UART service UUID
#define CHARACTERISTIC_UUID_RX "6E400002-B5A3-F393-E0A9-E50E24DCCA9E"
#define CHARACTERISTIC_UUID_TX "6E400003-B5A3-F393-E0A9-E50E24DCCA9E"
ServiceUUIDと受信用(RX)と送信用(TX)のCharacteristicUUIDを定義しています。UUIDの生成はコメントあるようにこのサイトでできるようです。
class MyServerCallbacks: public BLEServerCallbacks {
    void onConnect(BLEServer* pServer) {
      deviceConnected = true;
    };
    void onDisconnect(BLEServer* pServer) {
      deviceConnected = false;
    }
};
次に自作クラスの「MyServerCallbacks」がBLEServerCallbacksを承継して作成されその中のMethod(void)(よく理解できないですが、もしかしたらprotocolの関数なのかもしれません)を2つ記載して、BLEserverのポインタ変数pServerを引数として、「deviceConnected」の状態を接続の時はture、非接続の時はfalseとしています。
class MyCallbacks: public BLECharacteristicCallbacks {
    void onWrite(BLECharacteristic *pCharacteristic) {
      std::string rxValue = pCharacteristic->getValue();

      if (rxValue.length() > 0) {
        Serial.println("*********");
        Serial.print("Received Value: ");
        for (int i = 0; i < rxValue.length(); i++)
          Serial.print(rxValue[i]);

        Serial.println();
        Serial.println("*********");
      }
    }
};
次に自作クラスMyCallbacksを定義しています。このクラスは受信するBLEの値を処理するためのものです。BLECharacteristicCallbacksを承継しています。そのメソッド(プロトコルの関数?)のonWrite()では、BLECharacteristicのポインタ変数pCharaxteristicを引数としています。以下処理を見ていきます。
std::string rxValue = pCharacteristic->getValue();
この文がやはり最初よくわかりませんでした。一つずつ要素を見ていきます。
「std::string」ですが、ここの解説によると「::」は、名前空間の区切りであり、空間内(例、クラス)のプロパティーのようなものでしょうか?「std::string とは C++ で標準に使用できる便利な文字列クラス」のようですね。
つまり、文字列クラスとして「rxValue(受信する文字列)」を宣言し、その値を右辺から代入しているようですね。
pCharacteristic->getValue()の「->」がわかりませんでした。調べてみると、「->」はポインタ変数(ここではpCharacteristic)内のプロパティやメソッド(メンバ変数/関数というのでしょうか?)にアクセスするための演算子(アロー演算子)のようですね。
つまり、引数であるポインタ変数pCharacteristic内のメンバ関数(メソッド)のgetValue()により、値をゲットしてその値を文字列rxValueに代入するようです。
if (rxValue.length() > 0) {
        Serial.println("*********");
        Serial.print("Received Value: ");
        for (int i = 0; i < rxValue.length(); i++)
          Serial.print(rxValue[i]);

        Serial.println();
        Serial.println("*********");
      }
revalue.length()は文字列の長さを返すメソッド(Swiftでの.count)ですね。for文の書き方(for (int i = 0; i < rxValue.length(); i++))がSwiftUIと違いますが、長さ分だけrxValue[i]の文字をserialに表示するというものですね。
では、まずArduinoの必須関数であるsetup()の中身を見てみましょう。
void setup() {
  Serial.begin(115200);

  // Create the BLE Device
  BLEDevice::init("UART Service");

  // Create the BLE Server
  pServer = BLEDevice::createServer();
  pServer->setCallbacks(new MyServerCallbacks());

  // Create the BLE Service
  BLEService *pService = pServer->createService(SERVICE_UUID);

  // Create a BLE Characteristic
  pTxCharacteristic = pService->createCharacteristic(
										CHARACTERISTIC_UUID_TX,
										BLECharacteristic::PROPERTY_NOTIFY
									);

  pTxCharacteristic->addDescriptor(new BLE2902());

  BLECharacteristic * pRxCharacteristic = pService->createCharacteristic(
											 CHARACTERISTIC_UUID_RX,
											BLECharacteristic::PROPERTY_WRITE
										);

  pRxCharacteristic->setCallbacks(new MyCallbacks());

  // Start the service
  pService->start();

  // Start advertising
  pServer->getAdvertising()->start();
  Serial.println("Waiting a client connection to notify...");
}
Serial.begin(115200);
シリアル(モニター)を115200の速度で開始します。
この後に、先頭のコメントで書いてある処理を実行します。
The design of creating the BLE server is:
- Create a BLE Server
- Create a BLE Service
- Create a BLE Characteristic on the Service
- Create a BLE Descriptor on the characteristic
- Start the service.
- Start advertising.
順に見ていきます。
  // Create the BLE Device
  BLEDevice::init("UART Service");
ここでBLEDevice(SwiftUI内のBluetoothManager)の名前を「UART Service」として探すためのものです。
 // Create the BLE Server
  pServer = BLEDevice::createServer();
  pServer->setCallbacks(new MyServerCallbacks());
上で定義したpServerのポインタアドレスにBLEDevice(SwiftUI側のBLEManager)をServerとして作成し、そのpServerのメンバ関数のsetCallbacks()を、先に定義したMyServerCallbacks()を引数として実行します。この時new演算子とは、「メモリを動的に確保するため」のようですね。これにより、Serverの状態を得ることができます。
  // Create the BLE Service
  BLEService *pService = pServer->createService(SERVICE_UUID);
BLEServiceのポインタ変数pServiceを、pServerのメソッドcreateService()で作成します。このSERVICE_UUIDがSwiftUI側にも通知されます。
  // Create a BLE Characteristic
  pTxCharacteristic = pService->createCharacteristic(
										CHARACTERISTIC_UUID_TX,
										BLECharacteristic::PROPERTY_NOTIFY
									);

  pTxCharacteristic->addDescriptor(new BLE2902());
まず、BLECharacteristicのポインタ変数として上記定義した送信用のpTxCharacteristicに、pServerのメソッドのcreateCharacteristic()が引数として、送信用(TX)UUIDと「PROPERTY_NOTIFY」とを使用して実行されて、その値が代入されています。
そして、「pTxCharacteristic->addDescriptor(new BLE2902());」は、このpTxCharacteristicに値を記載するやり方を規定していると思われるBLE2902()をDescriptorとして追加しているようです。
BLECharacteristic * pRxCharacteristic = pService->createCharacteristic(
											 CHARACTERISTIC_UUID_RX,
											BLECharacteristic::PROPERTY_WRITE
										);
ここで受信用(Rx)のポインタ変数pRxCharacteristicをTxと同様にして作成しています。違いはPROPERTY_WRITEで、このWRITEとは受信した値を書き込むという意味だと思います。
pRxCharacteristic->setCallbacks(new MyCallbacks());
そして、この受信用のpRxCharacteristicのメソッドのsetCallbacks()を先に定義したMyCallbacks()を引数として新たに動的にメモリを確保して実行します。これによって、pRxCharacteristicはpServerに繋がっている場合には繰り返し実行されて、SwiftUI側からの値をpRxCharacteristicに読み込み、受信した場合にシリアルモニターに表示する上記処理が実行されます。
  // Start the service
  pService->start();

  // Start advertising
  pServer->getAdvertising()->start();
  Serial.println("Waiting a client connection to notify...");
これで先ほどまでに定義したpServerを開始し、Advertising(SwiftUI側のBLEManagerを探す)して見つかれば接続してstart()させます。
次に、繰り返し処理されるvoid loop()の内容を見ていきます。
void loop() {

    if (deviceConnected) {
        pTxCharacteristic->setValue(&txValue, 1);
        pTxCharacteristic->notify();
        txValue++;
		delay(10); // bluetooth stack will go into congestion, if too many packets are sent
	}

    // disconnecting
    if (!deviceConnected && oldDeviceConnected) {
        delay(500); // give the bluetooth stack the chance to get things ready
        pServer->startAdvertising(); // restart advertising
        Serial.println("start advertising");
        oldDeviceConnected = deviceConnected;
    }
    // connecting
    if (deviceConnected && !oldDeviceConnected) {
		// do stuff here on connecting
        oldDeviceConnected = deviceConnected;
    }
}
順に見ていきます。
 if (deviceConnected) {
        pTxCharacteristic->setValue(&txValue, 1);
        pTxCharacteristic->notify();
        txValue++;
		delay(10); // bluetooth stack will go into congestion, if too many packets are sent
	}
pTxCharacteristic->setValue(&txValue, 1);は、送信用のpTxCharacteristicに、値を設定しています。この時「&txValue」の「&」は「アドレス」を意味しているようで、uint8_t型で宣言したtxValueのアドレスを引数としてsetValue()に渡しています。また、その後ろの「1」は、多分uint8_tが1バイト(8ビット)のものなので、1バイトというサイズを引数としてアドレスと共にsetValue()に渡しているのだと思います。
そして、pTxCharacteristic->notify()で、pServerに送信(notify)します。
送信後にtxValueを1つ増加させます。また、コメントにもあるように、Arduinoは処理にdelay()を入れる必要が時々あるようです。bFaaaPの成澤さんのArduinoプログラミングでもdelay()がないと動作しないというコメントがありました。
      // disconnecting
    if (!deviceConnected && oldDeviceConnected) {
        delay(500); // give the bluetooth stack the chance to get things ready
        pServer->startAdvertising(); // restart advertising
        Serial.println("start advertising");
        oldDeviceConnected = deviceConnected;
    }
    // connecting
    if (deviceConnected && !oldDeviceConnected) {
		// do stuff here on connecting
        oldDeviceConnected = deviceConnected;
    }
ここでは、デバイスが非接続の場合はAdvertisingをするように処理し、デバイスが接続した時は「oldDeviceConnected = deviceConnected」として状態を接続状態にしています。
この処理を繰り返すことで、受信(Rx)があった場合にはそれをシリアルモニターに表示し、送信(Tx)として1バイトの整数をサーバー側(SwiftUI側)に送信することを実現しています。
では、M5StackとSwiftUIとの双方向コミュニケーションに最後に入ります。これは、以前述べたように、藤さんという方が公開されています(GitHubはこちら)ので、それをここでも検証用に使用したいと思います。実際のbFaaaPのものはM5Stackではないのですが、検証用にSwiftUI とArduinoのコミュニケーションを実現するためには大変有用なものです。上記GitHubからArduinoのSketchをダウンロードして実行しました。
コードの解説は上記のサイトをご参照ください。これを検証して、M5StackにLoadしたスクリーンショットです。
SwiftUIと双方向にコミュニケーションさせたものはこちらです。bFaaaP Pagerの譜めくり機能とArduino側が相互に連携しています。
これでArduino側の検証用の準備ができました。次回はSwiftUI側の設定に移ります。ArduinoユーザーはXcodeの設定には少し距離があると思うので、Xcodeの設定から始める予定です。
コメント